
FUT Hair Transplant: Process, Recovery, and What to Expect

For patients dealing with significant hair loss, achieving meaningful density often requires transplanting a large number of grafts in a single session. This is where the FUT hair transplant continues to hold a valuable place in modern hair restoration. Despite the rise of newer techniques, FUT remains one of the most effective methods for maximizing graft yield, and it continues to deliver excellent, long-lasting results for the right candidates.
At Golden State Dermatology, our specialists offer FUT hair transplants as part of a comprehensive, dermatology-led approach to hair restoration. In this article, we’ll explain exactly what FUT is, walk through the procedure from start to finish, outline what recovery looks like, and help you understand whether this technique might be right for you.
What Is FUT (Follicular Unit Transplantation)?

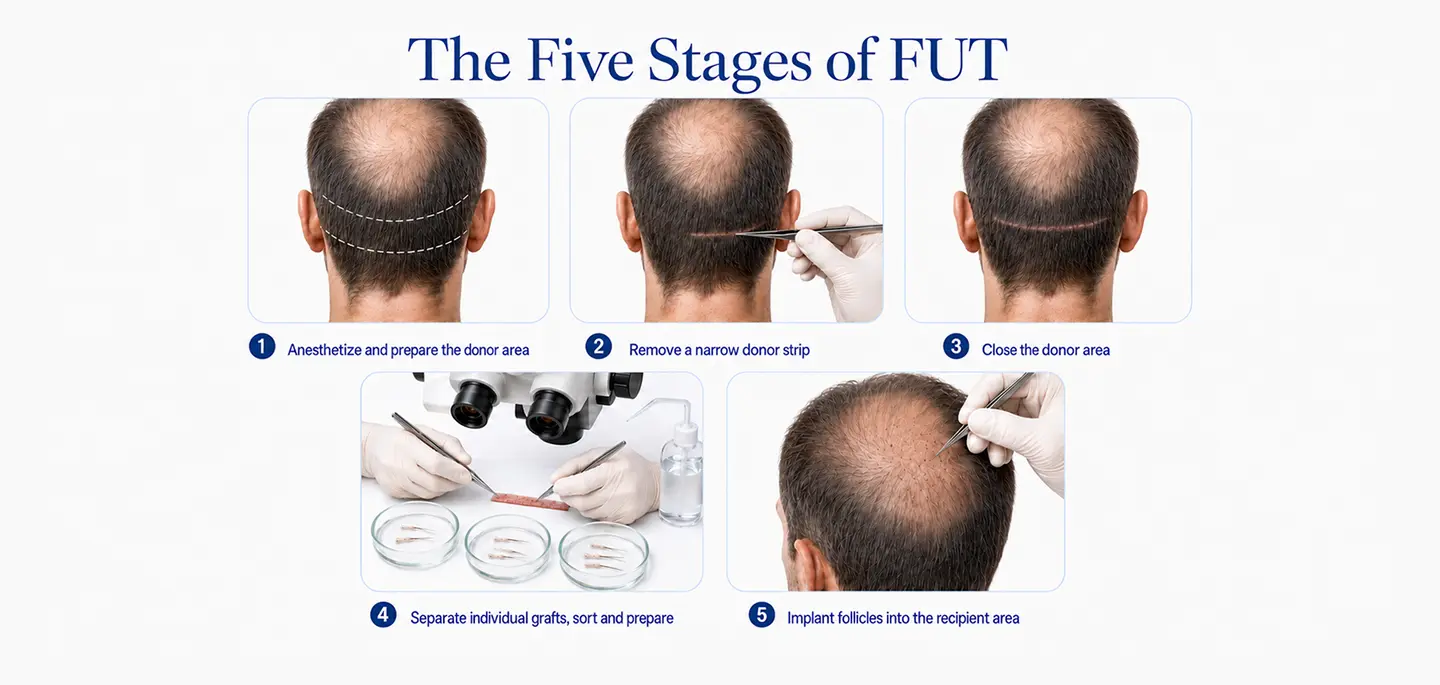
FUT stands for Follicular Unit Transplantation, sometimes referred to as the “strip method.” Unlike FUE, which extracts individual follicles one at a time, FUT involves surgically removing a thin strip of scalp tissue from the donor area — typically along the back of the head, where hair growth is most resistant to hair loss — and then dissecting that strip under microscopic magnification into hundreds or thousands of individual follicular units for transplantation. Because an entire strip of tissue containing many follicles is harvested at once, FUT is particularly well suited to patients who need a very high number of grafts in a single procedure. The donor site is then closed using a specialized suturing technique, resulting in a fine linear scar that is typically concealed by the surrounding hair.

FUT has remained a trusted technique in hair restoration for decades because of its efficiency, high graft survival rate, and ability to deliver substantial density in a single session — advantages that continue to make it a strong option for many patients today.

Who Is a Good Candidate for FUT?

FUT is not the right fit for every patient, which is why a detailed consultation with an experienced hair restoration specialist is essential before moving forward. Generally, good candidates for FUT include patients who:
During your consultation at Golden State Dermatology, Dr Rose will assess your scalp laxity, hair loss pattern, donor supply, and aesthetic goals to determine whether FUT, FUE, a Megasession, or a combination approach is the most appropriate path for you.

The FUT Hair Transplant Process, Step by Step

Every patient’s treatment plan is customized, but the FUT procedure generally follows a well-established sequence of steps designed to maximize graft survival and deliver natural, lasting results.

Step 1

The FUT Hair Transplant Process, Step by Step

The surgeon evaluates hair loss pattern, scalp laxity, donor density, and overall goals. This stage also includes hairline design, one of the most important factors in achieving a natural-looking outcome — accounting for facial proportions, age, and the subtle irregularity found in a genuine, undisturbed hairline.

Step 2

Preparing the Donor Area

On the day of the procedure, the donor area — typically a horizontal band along the back of the scalp — is trimmed to allow clear access for the surgeon. Local anesthesia is then administered so the patient remains comfortable and fully alert throughout, without the need for general anesthesia.

Step 3

Strip Harvesting

The surgeon carefully removes a thin strip of scalp tissue from the donor area. The width and length of the strip are determined in advance based on the number of grafts needed and the patient’s available scalp laxity. Because this step is performed with precision and skill, the resulting donor scar is typically fine and linear, easily concealed by surrounding hair once healed.

Step 4

Donor Site Closure

Once the strip has been removed, the donor site is closed using a meticulous suturing technique. Many providers use a trichophytic closure method, which allows hair to grow through the resulting scar tissue, further minimizing its visibility over time. The closure is designed to distribute tension evenly and support clean, cosmetically favorable healing.

Step 5

Graft Dissection Under Microscopic Magnification

While the donor site is being closed, a separate team of technicians works to dissect the harvested strip into individual follicular units under high-powered microscopes. This meticulous, time-intensive process allows for the preservation of naturally occurring follicular groupings — typically one to four hairs each — which supports natural-looking density once transplanted.

Step 6

Creating Recipient Sites

While grafts are being prepared, the surgeon creates tiny recipient incisions in the treatment area, carefully controlling the angle, depth, and direction of each site. This step directly determines the natural direction of hair growth once the transplanted follicles mature, making it one of the most technically important stages of the entire procedure.

Step 7

Graft Implantation

The individually dissected grafts are then placed into the prepared recipient sites, following the density and hairline plan established during the consultation. Because FUT allows for a very high graft count, this stage can take several hours, particularly for patients undergoing extensive restoration.

Step 8

Post-Procedure Instructions

Once the transplant is complete, the treatment area is cleaned, and patients receive detailed instructions for caring for both the donor incision and the recipient area during the initial healing period. Patients return home the same day, as FUT does not require an overnight hospital stay.

FUT Recovery: What to Expect Week by Week

Recovery from FUT follows a fairly predictable pattern, though the donor area requires a bit more attention during the initial healing phase compared to FUE, due to the linear incision and sutures.

Immediate Post-Procedure Period

In the first few days, mild swelling, tenderness, and tightness around the donor incision are common, along with small scabs forming at each recipient graft site. Patients are typically advised to sleep with their head elevated, avoid touching the treated areas, and follow a gentle cleansing routine. Most people can resume light daily activities within a day or two, though bending, heavy lifting, and strenuous movement should be avoided to protect the healing donor incision.

Days 1–3

Days 4–10

Scabbing and Suture Care

By the end of the first week, initial swelling generally subsides and the small scabs at the recipient sites begin to flake away naturally. The donor incision continues to heal during this period, and if non-dissolvable sutures or staples were used, they are typically removed by the provider around day 10 to 14. Patients should avoid scratching or picking at either the donor or recipient areas during this stage.

The "Shock Loss" Phase

Around two to four weeks post-procedure, many patients notice the newly transplanted hairs shedding. This is a well-documented and expected part of the process known as shock loss. The hair shaft is temporarily shed while the follicle itself remains healthy beneath the skin, entering a resting phase before new growth begins.

Weeks 2–4

Months 2–4

The Waiting Period

During this stage, visible changes on the scalp are often minimal, which can feel discouraging, but beneath the surface the follicles are preparing to transition out of their resting phase. The donor scar also continues to mature and fade during this period, gradually becoming less noticeable.

New Growth Begins

Most patients begin to notice new hair growth in the transplanted area starting around month four, with continued thickening through months six, seven, and eight. Early regrowth may appear finer or thinner before maturing to match the surrounding hair in texture and thickness.

Months 4–8

Months 9–12

Final Results Take Shape

By the ninth to twelfth month, the majority of results are typically visible, with some patients continuing to see subtle improvements in density and texture beyond the one-year mark. At this stage, the donor scar has usually matured into a thin line that blends well with surrounding hair, particularly when hair is kept at a moderate length.

Tips for a Smooth Recovery

To support optimal healing and graft survival after FUT, patients are generally advised to:

Benefits of Choosing FUT

FUT continues to be a valuable option in hair restoration for several important reasons:

High graft yield

FUT allows for the harvesting of a large number of grafts in a single session, making it well suited for patients with more extensive hair loss.

Efficient donor use

Because an entire strip is harvested at once, FUT can make efficient use of available donor density.

Strong track record

FUT is a well-established technique with decades of clinical experience behind it and consistently reliable results.

Cost efficiency for large sessions

Because more grafts can often be harvested per session compared to FUE, FUT can be an efficient option for patients seeking substantial coverage in fewer total procedures.

Concealable scarring

With a skilled surgical closure technique, the resulting linear scar is typically thin and easily hidden by hair of moderate length or longer.

FUT vs. FUE: How Do They Compare?

Patients often ask how FUT compares to FUE, and the honest answer is that neither technique is universally “better” — the right choice depends on each patient’s goals, donor supply, and lifestyle. FUT typically allows for a higher graft yield in a single session and can be an efficient option for patients seeking substantial density, while FUE offers a scar-free donor site and greater flexibility for those who prefer to wear their hair very short. Some patients even benefit from a combination approach, using both techniques to maximize graft yield while minimizing visible scarring in key areas. During your consultation, our specialists will walk you through the trade-offs of each method as they apply specifically to your hair loss pattern and goals.

Type

FUT (Strip Method)

FUE (Follicular Unit Extraction)

Scar type

Single fine linear scar

Tiny scattered dot scars

Grafts per session

Often 2,000–4,000+ in one sitting

Typically 1,500–3,000 per session

Best for

Longer hairstyles, high graft count

Short or shaved styles

Recovery

Suture removal ~10 days, desk work in days

Slightly faster, no suture

Donor preservation

Efficient use of donor zone as a whole

Distributed extraction across zone

Body hair grafts

Not applicable

Possible for supplemental grafts

Potential Risks and Considerations

As with any surgical procedure, FUT carries some potential risks. These may include temporary swelling, tightness, or discomfort around the donor incision, a visible linear scar for patients who prefer to wear their hair very short, temporary shock loss of existing hair, and — in rare cases — infection or delayed healing if aftercare instructions aren’t properly followed. Choosing an experienced, qualified provider and closely following pre- and post-procedure guidance significantly reduces these risks and supports the best possible cosmetic outcome.

Conclusion

FUT hair transplantation remains a highly effective and time-tested solution for patients seeking substantial hair restoration in a single session. From the initial hairline design and strip harvesting through meticulous graft dissection, precise implantation, and the months-long recovery and regrowth process, every stage of FUT is carried out with the goal of producing dense, natural-looking results.

If you’re exploring your hair restoration options and want to determine whether FUT is the right approach for your goals, Golden State Dermatology is here to help. Dr Rose, our world renowned ABHRS certified hair loss surgeon takes an individualized approach to every consultation, carefully evaluating your scalp, donor supply, and desired outcome to build a treatment plan tailored specifically to you.

Ready to Find Out What's Possible?

A private consultation with Dr. Rose is the first step — no obligation, no pressure, just an honest plan.